Chevy Volt Spare Tire Options
Do Nothing
The Chevy Volt does not come with a spare tire, but it does come with a fix-a-flat can that is supposed to fill any holes in your tire and inflate your tire to a point where you can drive for help. However, there are many reports of Chevy Volt owners using the can to fix a simple screw hole and it doesn’t work. That’s lead many owners to look for other Chevy Volt spare tire options.
Get a AAA or similar Auto Coverage Plan
If you have auto insurance coverage that includes flat repair or free towing, it can be the simplest way to get help in the case of a flat tire. However, these services can take longer than simply changing out a damaged tire for a spare tire if you have the know-how, and of course, the needed parts to do the swap.
Get a tire plug kit
A simple tire repair kit can be had for a few dollars, or a more deluze, better sealing, easier to use mushroom plug kit can be had for around $50 from Amazon
 With a tire plug kit, make sure you have a way to fill the tire back up after you’ve plugged the hole!
OEM Chevy Volt Spare Tire Kit
The 2nd Generation Chevrolet Volt spare tire kit is around $340 from the dealer.

DIY Chevy Volt Spare Tire
For virtually identical parts, you can get the same Chevrolet OEM parts from different vehicles for around $150
DIY Chevy Volt Spare Tire Kit
PARTS LIST for Gen 2 Volt
Compact Spare Tire: Maxxis T115/70R16 92M tire on 16×4 wheel with 5x105mm lug pattern and 42mm offset. This is the Volt OEM spec and also happens to be identical to the compact spare on the 2011-15 Chevy Sonic and Cruze. I purchased an unused 2013 Sonic spare on ebay for $60 shipped. The steel wheel markings may be slightly different than the Volt OEM kit since there are several manufacturers (and countries of origin) for GM. This wheel is otherwise identical to the one in the OEM Volt kit and is a perfect fit. Chevy Sonic Spare on Ebay
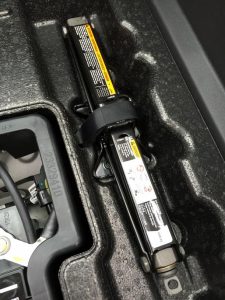
Jack and Tools: The Volt’s storage tray under the rear floor has a custom space for a scissor jack. The 2012-15 Chevy Sonic OEM scissor jack (and perhaps the Cruze scissor jack, but not verified) is a perfect fit. Other jacks, even from similar Chevy models, may not fit properly because the base “foot” of the jack could be to large for the custom molded cavity. The OEM Sonic jack comes with a two piece, hook-and-handle tool whereas the OEM Cruze jack has a one-piece, fold-out lug wrench in a fabric case. I purchased an unused 2015 Sonic jack/tool kit on ebay for $35 shipped. It may be possible to order the OEM Volt jack separately from GM but someone with the actual kit would have to supply the part number stamped on the jack itself. Chevy Sonic Jack Kit on Ebay Sometimes the wheel and jack will come up for sale as an assembly on Amazon
Jack Securement Strap: There are two slots in the floor tray for this strap. Use a standard, 1-inch wide by 18-inch long velcro strap with cinching buckle. $2 online at McMaster-Carr, ebay, etc.

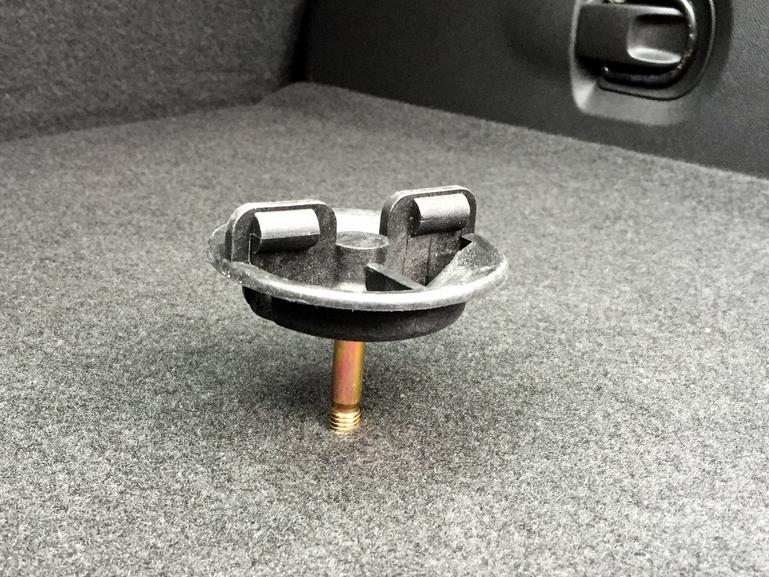
Tire Hold-down: This is where I deviate from the design of the OEM kit. With the OEM kit, Chevy provides an 8-inch long threaded post that secures to a threaded bracket under the floor. Once installed, this post sticks out about 4-inches above the cargo floor regardless if the spare is there or not. If you remove your spare in order to haul stuff in the back, this threaded post will be in the way of anything you try to put in the cargo area. To eliminate this post altogether, I created a shorter, female-threaded post that sits just below the cargo floor. This allows me to use a conventional spare tire retainer knob to secure the spare just like most spare tire installations in cars that have the spare under the rear floor. If I remove the retainer knob and spare, the floor is flat once again. The parts are: one M8x1.25 metric threaded rod, Class 8.8 steel, zinc-plated, 100mm long; one M8x1.25 hex coupling nut, Class 8 steel, zinc-plated, 24mm long; two M8x1.25 metric locking nuts; one 2004 Chevy Aveo spare tire retainer knob. The hardware was about $5 (McMaster-Carr online) and the Aveo spare retainer was from ebay for $12. SPECIAL NOTE: I believe the Aveo retainer is GM part number 96586892 according to gmpartsdirect.com. If you can’t find this exact retainer or a similar-sized alternative, you could install another 100mm metric threaded stud in its place and use a hold-down nut similar to the one used to secure the pump kit under the floor. The OEM kit uses the same hold-down nut to secure the spare as is used for the pump kit. However, the 100mm stud could still be easily unscrewed and removed when not in use to make the floor flat.

Spare Tire Cover (optional): This gives the spare tire installation a finished look in the cargo area. I used a Classic Accessories 21-22” Spare Tire Cover, black, from Amazon for $14. Perfect, snug fit and looks OEM.
Cargo Floor Pull-up Tab (bonus): Tired of fishing around the edge of the cargo floor to find a carpet edge to pull up? Try that with gloves! Chevy should have installed a simple pull tab on the floor –a surprising detail overlooked. To remedy this, I installed a black velcro strip (the soft loop side, not rigid hook side), 1 inch wide by 5 inches long, with self-adhesive backing per instructions below.
INSTALLATION
1. Remove fabric-covered cargo floor and pump kit.
2. Using a flat blade screwdriver, loosen the three plastic trim fasteners that secure the rigid foam under-floor tray to the body. Lift out the tray and install the velcro hold-down strap through the slots provided in the jack storage location of the foam tray. Reinstall foam tray (tip: be sure to align the pump kit retainer screw with the hole in the tray) and push the three clips back into place (they push straight down to re-attach). Reinstall the pump kit.
3. Install the jack and secure it with the velcro strap. If you have the Cruze wrench in the fabric bag, this will simply attach to the side of the jack. If you have the Sonic jack and tools, you can store the L-shaped lug wrench under the pump kit and slip the hooked-rod between the long side of the pump kit bag and the foam tray wall. They won’t rattle around or come loose.
4. Prepare the tire hold-down rod. Thread one lock nut onto the threaded rod until it leaves about 15mm of thread protruding from the end. You will likely need to use Vice-Grips to hold the middle of the rod while you turn the locknut with a wrench. Thread the other locknut onto the opposite end of the rod until about 7mm of thread protrudes from that end. On this same (short thread) end, thread on the hex coupling nut until it stops against the nut. Tighten the nut and coupler against each other to lock them in place. The hold-down rod is now complete.

5. Thread the hold-down rod (coupler end up) into the threaded bracket in the floor through the deep hole in the rigid foam tray. It will stop turning when the locknut on the bottom end of the rod touches the bracket. The top surface of the hex coupling nut should be slightly protruding from the surface of the rigid foam tray. Place a socket wrench or open-end wrench on the coupler and give it a slight turn clockwise to snug the rod to the bracket. The hold-down rod is now installed.


6. Add a cargo floor pull-up tab (silly omission by Chevy). This will save you having to fish around the edge of the carpet to grab an edge to pull up when you need to access the pump kit or jack. Prepare the velcro strip by peeling off the self-adhesive backing paper and fold one end of the velcro strip over on itself to make a “tab” about 1 inch long. This tab will have the soft loop of the velcro on both sides. Attach the remaining length of the strip to the underside of the cargo floor at the center point so that the folded-over, “tab” end of the velcro protrudes just beyond the edge of the cargo floor edge. Press the strip in place firmly. You now have a convenient pull tab that looks OEM and that makes pulling up the floor much easier.
7. Place the fabric-covered cargo floor back into the cargo compartment. In the spot where the hold-down rod is located, you’ll notice that the fabric floor has a cutout in the rigid board to clear the spare tire hold down rod in the OEM kit. If you press on the fabric in this area you’ll feel your hex coupling nut just underneath. When you’ve located the threaded hole in the coupling nut, use a precision X-acto blade to cut out a small circle of the fabric around the hole so that the to expose the threads underneath. This is where the spare tire retainer screw will pass through and thread into the coupling nut when you secure the spare. Thread the spare tire retainer screw in and out of the coupling nut a few times to finish sizing the hole in the fabric.
8. Once the hole is cut in the fabric floor, place the spare tire in place with the large cavity of the wheel facing up (like a giant salad bowl). Center the wheel over the hole you made in the floor and simply thread the Aveo spare tire retainer into place. NOTE: The Aveo retainer is usually a two-piece kit: the main part is the knob with a 45mm threaded shaft protruding out and the second part is a stamped steel piece that’s unique for the Aveo. You only need the knob with the threaded shaft. Hand-tighten.


9. Install spare tire cover. The cover is meant to be a snug fit and I found it easier to install the entire cover before putting the wheel into the car. Once you have the cover fully installed, place the wheel in the cargo area and peel back part of the cover so that you can put the spare retainer in place and tighten it down. Then, simply stretch the cover back over and tuck it under the tire.
Now, if you ever want to remove the spare tire for any reason, you can do so easily and it will leave the floor completely flat for cargo (unlike the factory kit that has the threaded rod sticking out of the floor at all times, even when the spare is removed).

Notes and Cautions
NOTES ON JACKING UP THE 2016 VOLT
The 2016 Volt does not use the rocker panel flange as the jacking surface under the car. Yes, there is a shallow notch in the flange to show you where to locate the jack near each wheel but the actual surface that the jack pushes against is just behind the flange notch. Behind each flange notch is a flat, structural pad in the underbody crossmember that serves as the actual surface the jack pushes on to lift the car. The jack supplied in the OEM spare tire kit has a large flat surface with two little “hooks” that straddle the rocker flange. It’s the flat surface of the jack pad that pushes against the underbody jack points instead of the flange itself. This prevents damage to the flange. So, when placing the Sonic or Cruze jack under the car, make sure the top of the jack is placed behind the rocker flange and onto the large, 2 inch by 2 inch flat pad behind the flange. This way, you’ll avoid damaging the flange and will ensure that the jack supports the car at the proper structural spot.

Most details from this thread on GM-Volt http://gm-volt.com/forum/showthread.php?221834-Millivolt-Mod-Spare-Tire-Kit-REDUX
Big thanks to MilliVolt for compiling the spare tire information into an easy-to-read location!
Gen 2 and Gen 1 differences
The 2nd generation Volts have different wheel specs than the Gen 1 Volts. The 2016 bolt pattern is 5x10⁵xm12, rim size is 17×7 Offset is 41 mm, center bore is 56.6.
Gen 1 Mounting
The 1st generation Volts do not have the threaded hole below the cargo deck, so the spare tire cannot be bolted down unless you bolt it to the cargo deck, or get real creative and use a drill or welder.
Here is one method used to mount the spare tire through the cargo deck:

Source: https://gm-volt.com/forum/showthread.php?115130-Spare-Tire-Cargo-Mount
Scissor Jack Notes
In 2018, the jack/lifting points have changed and requires a different hjack than the 2017 Volt. It has a flat head with a side mounted saddle for the pinch weld, rather than simply a ‘valley’ that the pinch weld sites in as the older Volt models have.

I just bought a temporary spare out of a 2015 Chev Cruze, from a salvage yard, and it DOES NOT FIT on my 2014 Volt.
The bolt circle pattern is about 1/4″ to 3/16″ too small.
I took it right out of the wrecked trunk of a 2015 Cruze. I suppose it could have been switched with the wrong wheel (?). I don’t know; the yard took it back for future credit. I only lost $16. Any suggestions?
Hey Alan sorry to hear that! I rechecked the specs, and the 2014 Chevy Volt is 5×115 and the 2015 Chevy Cruze wheel bolt patterns are listed as 5×115 – so it won’t fit. Before you head back to the junkyard, check out how to measure the bolt pattern here
As stated in the Volt Spare Tire Guide:
https://gm-volt.com/forum/showthread.php?48058-Volt-Spare-Tire-Guide
The Cruze and Sonic spare tires will only fit Gen-2 Volts, Gen-1 tire bolt pattern is 5×115, the Sonic/Cruze are 5×10⁵. My tire place verified the spare from my Sonic would not fit my 2015 Volt.
That’s right, thanks for taking the time to let me know! Information updated
Are there other retainer bolts/handles that fit besides the ’04 Aveo — can’t seem to find one!
https://www.arizonachevroletparts.com/p/Chevrolet__Aveo/Spare-Tire-Bolt/48667668/96586892.html?partner=googlebase_adwords&kwd=&origin=pla&partnerDevice=c&userLocation=1018165&gclid=Cj0KCQjwoKzsBRC5ARIsAITcwXE4tEedkvjIveTgBcxtv-O94jHr95CvvW3yQF8wqqklBL1xnp7PRIMaAvP4EALw_wcB
I bought mine through here and it was under $9 w/shipping
Awesome!
I spent 30 minutes looking for this. Then I decided to look down at the bottom just in case someone found it. Thank you so much Kevin!
Unfortunately I got a terse email from that supplier this morning: Part is discontinued.
This is a great post.
I bought the spare tire with jack kit on Ebay a few months after buying my Volt 2018. I only tried the spare tire yesterday and it worked just fine. Now I am working at the installation in the trunk.
Thank you so much for taking the time to write this wiki.
I just wanted to thank the good soul who put this together. It was an incredible resource for me and worked like a charm on my 2018 Volt.
Since the Aveo tire retainer is hard to find, I ended up using the spare tire retainer for the 2011-2020 Kia Cadenza Optima (Part # 62850-2T100), which was pretty easy to find on ebay and elsewhere.
According to this guy, you can use a spare wheel/tire form a 2002-2006 Nissan Altima. I”ll keep you posted and see how it works our for me. I have a 2013 Volt.
https://www.youtube.com/watch?v=F7v68IrlxLU