View original posts on the My iMiev Forum
Forum user GdB didn’t want to pay $250 for a 45 pound hitch just to carry bikes behind his electric vehicle. Instead, he decided to build his own light weight receiver hitch adapter. It’s strong enough to support him standing on it, and would likely allow for towing a small trailer as well.
Built out of a 10x10x3/16 plate of steel and welded to an unfinished 1-1/4 hitch receiver from Amazon
Total cost for supplies was around $100
- It transmits longitudinal, lateral, vertical and left right roll torque loads through the bumper. Longitudinal is limited by the two small 1/4″ bolts and 18 self taping screws through the bumper.
- The vertical pitch torque load is greatly assisted by a short link to the engine/transmission anti-torque bolt that has a 10mm thread, and 14mm nut and bolt head.
- Side to side torque is greatly assisted by a link to the Dedion bolt on the left side, 12mm thread, 17mm nut and bolt head.
- Installation is much trickier and requires special tools including an angle drill, and safety goggles. I got branded on the chest by a falling sliver of drill droppings.
- Attached to it is a 30 lb 1upusa bike rack that works great! Notice the load test. I actually jumped up and down so it’s good to about 300 lb vertical load. It felt totally rigid.


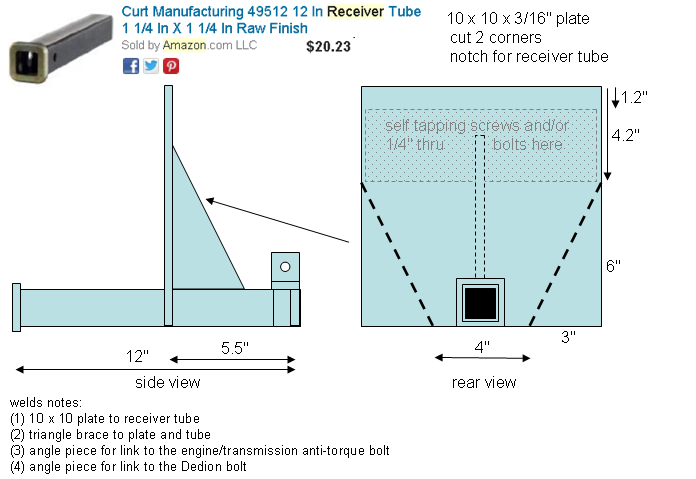
- The screws in the above diagram upper plate area (shaded grey) go into the back of the steel bumper. I used two 1/4″ x 2-1/4″ thru bolts at the lower corners of this screw area to insure that if the self taping screws loosen, the bolts would be a backup.
- I forgot to include dimensions for the two links on the end of the receiver tube.
- The side link is at most 18.5″, with the distance between the receiver tube center-line and Dedion bolt being 17″.
- The vertical link is at most 9″, with the distance between the receiver tube center-line and engine Dedion bolt being 7″. This link needs to be angled back far from perpendicular, which makes a welded tab helpful for installation…
- I welded two tabs on the receiver tube to be sure I could connect the links I wanted to use. I did not want to put bolts thru the receiver tube for fear of those obstructing during usage… But that’s not likely an issue with a 12 inch tube.
- Scrap metal was used, but similar to these metal brackets
- For the links I used some extra pieces from an old baby bike seat, but the hole punched angle available at hardware stores is totally suitable. These links are minimally loaded, and I expect thinner to be better in a minor rear end impact. Thin links will crumple and rotate at the bolts (USE ONLY 1 BOLT AT EACH LINK END!). A hard rear end impact will likely be a total loss anyway. The heavy hitch kit might help reduce damage but for a hard impact I don’t think it will make much difference.
- Thru bolts should not be longer to not interfere with bumper foam. I used a little spray can polyurethane foam to hold the loose bumper foam. The bumper foam was already loose from the factory so that would hold it a little better.